Application Configuration
Overview
This page aims to give you a comprehensive reference on the configuration properties used within Microcks. These informations are the ideal companion of the Architecture & Deployment Options explanations and will be crucial for people who:
- Want to install Microcks - providing info on what can be configured and what are the defaut values,
- Want to customize configurations - providing info on what can be used to provide customized Docker-Compose files,
- Want to develop or extend Microcks - providing comprehensive info on what's externalized as properties and guidelines on how to extend.
Before starting, it's important to understand how configuration files are actually organized and served to different components. As Microcks is
delivered via container images, the configuration is externalized into .properties files that should be mounted into containers on the
/deployments/config mouting path.
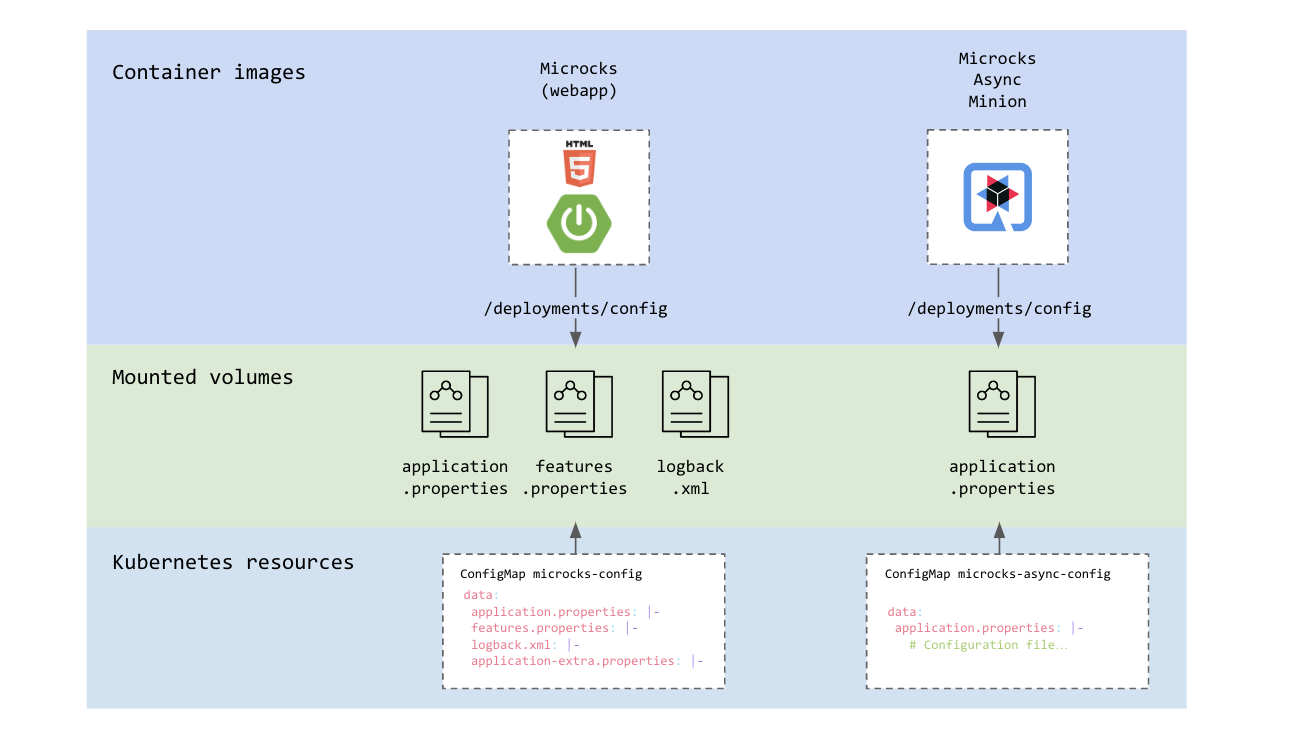
The way these configuration properties are supplied is different depending how you use Microcks:
- When ran via Docker Compose, Podman Compose or via the Docker Desktop Extension, the properties files are difrectly managed as files on local filesystem
- When ran on Kubernetes and installed via Helm CHart or Operator,
the properties files are suuplied to the components using
ConfigMapresources. - When ran through our Testcontainers module, you just setup environment variables that will be used as values when laoding the configuration properties.
It's important to note that depending on the method you use for installation, the configuration properties may have different names. However, we're just
following installation method idioms and conventions so that matching should be straightforward. For example, a configuration property named
features.feature.repository-filter.label-key=value in a raw properties file will be matched with the following YAML equivalent when configuring
via Helm values.yaml or Operator Resource:
features:
  feature:
    repositoryFilter:
      labelKey: value
🚨 In this page, we use the raw properties notation that can be used easily on your local machine when testing via Docler Compose. Be sure to check the Helm Chart or Operator reference documentations to get the equivalent.
Webapp component config
This section details the configuration properties used by the main Webapp component of Microcks.
application.properties
application.properties is the main configuration file where core features are configured.
Network & management
The Webapp component restricts the size of uploaded files to 2MB by default. It also configures a bunch of
management features and endpoints at startup:
# Application configuration properties
spring.servlet.multipart.max-file-size=${MAX_UPLOAD_FILE_SIZE:2MB}
spring.jackson.serialization.write-dates-as-timestamps=true
spring.jackson.default-property-inclusion=non_null

server.forward-headers-strategy=NATIVE

management.endpoints.enabled-by-default=false
management.endpoints.jmx.exposure.exclude=*
management.endpoints.web.exposure.include=*
management.endpoint.metrics.enabled=true
management.endpoint.prometheus.enabled=true
management.metrics.export.prometheus.enabled=true
management.metrics.distribution.percentiles-histogram.http.server.requests=true
management.metrics.distribution.slo.http.server.requests=1ms, 5ms, 10ms, 25ms, 50ms, 100ms, 250ms, 500ms, 1000ms, 2500ms, 5000ms, 10000ms

# OpenTelemetry configuration properties
# Service identification
management.opentelemetry.resource-attributes."service.name"=${OTEL_SERVICE_NAME:microcks}
management.opentelemetry.resource-attributes."service.namespace"=microcks-ns
management.opentelemetry.resource-attributes."service.instance.id"=microcks-cnt
management.opentelemetry.resource-attributes."service.version"=${project.version}

# Tracing configuration
management.tracing.sampling.probability=${OTEL_TRACES_SAMPLING_PROBABILITY:1.0}
management.tracing.propagation.type=W3C,B3
management.tracing.export.enabled=${OTEL_TRACES_EXPORTER_ENABLED:false}
management.tracing.export.otlp.enabled=${OTEL_TRACES_EXPORTER_ENABLED:false}
management.opentelemetry.tracing.export.otlp.endpoint=${OTEL_EXPORTER_OTLP_ENDPOINT:http://o11y_otel:4318}/v1/traces
management.opentelemetry.tracing.export.otlp.headers.Authorization=${OTEL_EXPORTER_OTLP_HEADERS_AUTHORIZATION}

# Metrics configuration
management.otlp.metrics.export.enabled=${OTEL_METRICS_EXPORTER_ENABLED:false}
management.otlp.metrics.export.url=${OTEL_EXPORTER_OTLP_ENDPOINT:}/v1/metrics
management.otlp.metrics.export.headers.Authorization=${OTEL_EXPORTER_OTLP_HEADERS_AUTHORIZATION}

# Logs configuration
management.logging.export.enabled=${OTEL_LOGS_EXPORTER_ENABLED:false}
management.opentelemetry.logging.export.otlp.endpoint=${OTEL_EXPORTER_OTLP_ENDPOINT:http://o11y_otel:4318}/v1/logs
management.opentelemetry.logging.export.otlp.headers.Authorization=${OTEL_EXPORTER_OTLP_HEADERS_AUTHORIZATION}
Components connection
The Webapp component should know how to connect to external component and the callback those one should use:
tests-callback.url=${TEST_CALLBACK_URL:http://localhost:8080}
postman-runner.url=${POSTMAN_RUNNER_URL:http://localhost:3000}
async-minion.url=${ASYNC_MINION_URL:http://localhost:8081}
default-artifacts-repository.url=${DEFAULT_ARTIFACTS_REPOSITORY_URL:#{null}}

validation.resourceUrl=http://localhost:8080/api/resources/
Scheduled imports
The interval at which Import Jobs are scheduled can be configured using a CRON expression. Default is every 2 hours:
services.update.interval=${SERVICES_UPDATE_INTERVAL:0 0 0/2 * * *}
Async API support
The Webapp component can be configured to support AsyncAPI and use Kafka to publish chnage events.
# Async mocking support.
async-api.enabled=false
async-api.default-binding=KAFKA
async-api.default-frequency=3

# Kafka configuration properties
kafka.bootstrap-servers=${KAFKA_BOOTSTRAP_SERVER:localhost:9092}
kafka.producers.service-changes.key-serializer=org.apache.kafka.common.serialization.StringSerializer
kafka.producers.service-changes.value-serializer=io.github.microcks.event.ServiceViewChangeEventSerializer
kafka.producers.asyncapi-triggers.key-serializer=org.apache.kafka.common.serialization.StringSerializer
kafka.producers.asyncapi-triggers.value-serializer=io.github.microcks.event.AsyncAPITriggerCommandSerializer
Conformance metrics computing
Those properties defines how conformance result trend is computed:
# Test conformance computation config
test-conformance.trend-size=3
test-conformance.trend-history-size=10
AI Copilot
The Webapp component may use a generative AI LLM for its AI Copilot features:
# AI Copilot configuration properties
ai-copilot.enabled=false
ai-copilot.implementation=openai
ai-copilot.openai.api-key=sk-my-openai-api-key
#ai-copilot.openai.api-url=http://localhost:1234/
ai-copilot.openai.timeout=30
ai-copilot.openai.maxTokens=3000
#ai-copilot.openai.model=gpt-4-turbo-preview
Security settings
All the security related settings (network, identity provider connections, CORS support, etc...) can be found in Security Configuration reference.
features.properties
The features.properties holds configuration properties that should be distributed to the UI or external components discovering Microcks capabilities.
Hub Access
Integration of Microcks Hub as a marketplace to retrieve API & Services mocks is enabled by default:
features.feature.microcks-hub.enabled=true
features.feature.microcks-hub.endpoint=https://hub.microcks.io/api
features.feature.microcks-hub.allowed-roles=admin,manager,manager-any
🗒️ The
manager-anyis not actually a role, it's a notation meaning "A user that belong to any management group even if not endorsing the global manager role".
Async API support
Support for AsyncAPI is an optional feature that is disabled by default. Endpoints informations may be provided for each supported binding:
features.feature.async-api.enabled=false
features.feature.async-api.frequencies=3,10,30
features.feature.async-api.default-binding=KAFKA

features.feature.async-api.endpoint-KAFKA=my-cluster-kafka-bootstrap.apps.try.microcks.io
features.feature.async-api.endpoint-MQTT=my-mqtt-broker.apps.try.microcks.io
#features.feature.async-api.endpoint-<BINDING>=endpoint-information
Repository filtering
Repository filtering allows using labels for segregating the API & Service repository. See this section in Organizing Repository guide. It is enabled by default with those values:
features.feature.repository-filter.enabled=false
features.feature.repository-filter.label-key=domain
features.feature.repository-filter.label-label=Domain
features.feature.repository-filter.label-list=domain,status
Repository segmentation
Repository tenancy allows using labels for segmenting the API & Service management permsissions. See this section in Organizing Repository guide. It is disabled by default with those values:
features.feature.repository-tenancy.enabled=false
features.feature.repository-tenancy.artifact-import-allowed-roles=admin,manager,manager-any
🗒️ The
manager-anyis not actually a role, it's a notation meaning "A user that belong to any management group even if not endorsing the global manager role".
Async Minion component config
This section details the configuration properties used by the optional Async Minion component of Microcks.
application.properties
application.properties is the only configuration file used.
💡 When launched using Docker Compose, the Async Minion is run with a profile named
docker-compose. Each property below should then be prefixed with%docker-compose.So -for example- if you want to change the Http port to
8082, you'll actually need to setup%docker-compose.quarkus.http.port=8082.
Behavior
The Async Minion behavior can be configured in terms of supported protocols (minion.supported-bindings), restricted message-producing frequencies (minion.restricted-frequencies is a coma-separated list of delays in seconds between 2 publications) and default Avro encoding (see Kafka, Avro & Schema Registry)
# Configure the minion own behavioral properties.
minion.supported-bindings=KAFKA,WS
minion.restricted-frequencies=3,10,30
minion.default-avro-encoding=RAW
Network & management
The Async Minion uses a non-standard 8081 port for listening. Kafka health probe is enabled by default:
# Configuration file.
quarkus.http.port=8081

# Configure the log level.
quarkus.log.level=INFO
quarkus.log.console.level=INFO

# Configure kafka integration into health probe.
quarkus.kafka.health.enabled=true
Components connection
The Async Minion component should know how to connect to Microcks. Keycloak/IDP connection is discovered dynamically from Microcks or can be overridden at the local level (commented by default):
# Access to Microcks API server.
io.github.microcks.minion.async.client.MicrocksAPIConnector/mp-rest/url=http://localhost:8080
microcks.serviceaccount=microcks-serviceaccount
microcks.serviceaccount.credentials=ab54d329-e435-41ae-a900-ec6b3fe15c54

# Access to Keycloak URL if you override the one coming from Microcks config
#keycloak.auth.url=http://localhost:8180
Kafka connection
The Async Minion -in the stadnard distribution- is connecting to a Kafka broker to receive the service change events. If connecting to a Schema Registry (see
this guide), the Confluent compatibility mode is the one selected by default:
# Access to Kafka broker.
kafka.bootstrap.servers=localhost:9092

# For Apicurio registry
#kafka.schema.registry.url=http://localhost:8888
#kafka.schema.registry.confluent=false

# For Confluent registry
#kafka.schema.registry.url=http://localhost:8889
kafka.schema.registry.confluent=true
kafka.schema.registry.username=
kafka.schema.registry.credentials.source=USER_INFO

mp.messaging.incoming.microcks-services-updates.connector=smallrye-kafka
mp.messaging.incoming.microcks-services-updates.topic=microcks-services-updates
mp.messaging.incoming.microcks-services-updates.key.deserializer=org.apache.kafka.common.serialization.StringDeserializer
mp.messaging.incoming.microcks-services-updates.value.deserializer=io.github.microcks.minion.async.client.ServiceViewChangeEventDeserializer

# Do not save any consumer-offset on the broker as there's a re-sync on each minion startup.
mp.messaging.incoming.microcks-services-updates.enable.auto.commit=false
mp.messaging.incoming.microcks-services-updates.bootstrap.servers=localhost:9092

mp.messaging.incoming.microcks-asyncapi-triggers.connector=smallrye-kafka
mp.messaging.incoming.microcks-asyncapi-triggers.topic=microcks-asyncapi-triggers
mp.messaging.incoming.microcks-asyncapi-triggers.key.deserializer=org.apache.kafka.common.serialization.StringDeserializer
mp.messaging.incoming.microcks-asyncapi-triggers.value.deserializer=io.github.microcks.minion.async.client.AsyncAPITriggerCommandDeserializer

# Do not save any consumer-offset on the broker as this is fire and forget consumption of events.
mp.messaging.incoming.microcks-asyncapi-triggers.enable.auto.commit=false
mp.messaging.incoming.microcks-asyncapi-triggers.bootstrap.servers=localhost:9092
Optional brokers
You can connect the Async Minion to additional event messages brokers using the properties section below. By design, the actual connection is done only at message transmission time and not at startup.
# Access to NATS broker.
nats.server=localhost:4222
nats.username=microcks
nats.password=microcks

# Access to MQTT broker.
mqtt.server=localhost:1883
mqtt.username=microcks
mqtt.password=microcks

# Access to RabbitMQ broker.
amqp.server=localhost:5672
amqp.username=microcks
amqp.password=microcks

# Access to Google PubSub.
googlepubsub.project=my-project
googlepubsub.service-account-location=/deployments/config/googlecloud-service-account.json

# Access to Amazon SQS
amazonsqs.region=eu-west-3
amazonsqs.credentials-type=env-variable
#amazonsqs.credentials-type=profile
amazonsqs.credentials-profile-name=microcks-sqs-admin
amazonsqs.credentials-profile-location=/deployments/config/amazon-sqs/aws.profile
#amazonsqs.endpoint-override=http://localhost:4566

# Access to Amazon SNS
amazonsns.region=eu-west-3
amazonsns.credentials-type=env-variable
#amazonsns.credentials-type=profile
amazonsns.credentials-profile-name=microcks-sns-admin
amazonsns.credentials-profile-location=/deployments/config/amazon-sns/aws.profile
#amazonsns.endpoint-override=http://localhost:4566

# Access to IBM MQ broker.
ibmmq.server=localhost:1414
ibmmq.queue-manager=QM1
ibmmq.channel=DEV.APP.SVRCONN
ibmmq.username=
ibmmq.password=